My Bathroom Remodel: Clawfoot Tubs

Remodeling a bathroom is exciting but definitely overwhelming!  My husband and I have remodeled quite a few of our own and for clients of his when he was in the construction business.  We've learned something from each remodel.  Our latest remodel is our master bathroom and we have throughly enjoyed the outcome and special touches in it!  Join me in a series of blog post telling you about each of those special touches, including our clawfoot tub, spa shower, additional storage space and final touches.   

Our clawfoot soaking tub is where I will start.  I remember as a child going to family member's homes who had clawfoot tubs in their bathrooms where ring shower curtains were added later to convert the use of showering.  Remember?  


 Although I saw the issues with showering in one of these, I still always wanted one in my own home.  When we started planning our master bathroom remodel I decided to ditch our BEAUTIFUL jet tub and incorporate a clawfoot tub.  Who wants to fight me for this beauty?  ;)


Believe it or not, it ended up at a men's hunting club!!!  I'm sure they felt as manly as my husband did waking up to it each day.

I began my search by pricing clawfoot tubs at local hardware stores and found them to run $1500 or more.  Keep in mind, that didn’t even include the plumbing!  I was fairly certain that “new” was not how I was going to go but I wanted to see what was available. 

I looked around at antique stores, junk stores, Craigslist and companies who specialize in iron products.  Allen’s Ironworks in Tarrant is where we ended up purchasing ours.  Our friend, Larry Foster, assisted us with the purchase.  First, Larry helped me to determine what size of tub I could have.  Then we he showed me how different the claw feet could make the tub look.  I wanted my tub to have pretty feet! 
 
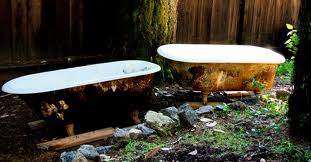
Secondly, I learned that the plumbing was the most expensive part and that for the most part the plumbing is fairly standard from tub to tub when it comes to prepping your area and dimensions.  I was able to order the plumbing from Allen’s Ironworks.  Within 3 months, a tub came into Allen's that I fell in love with much like the ones below. 


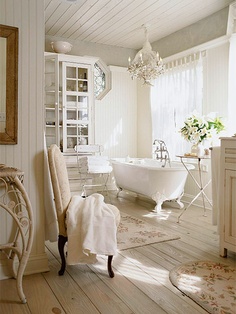
Can you imagine why my 8 year old daughter was concerned? The next hurdle is where my love for decorating came in!  I wanted to make sure I chose just the right finishes for our antique tub.  This by far was the fun part!!!!   

I tend to be more conservative so I started out looking at just a simple white finish.  However, I began finding some really unique ways to finish my tub though so I decided to consider something different. 


I saw several tubs finished in bright bold colors and fell in love with them but they really were not the style of my home.  If I were a contemporary girl, I really would love this look.  Don't you?


When I found this one, I fell in absolute love with it.  However, I was a bit scared of how the finish would turn out and it was a bit fancier than my style. 


Then I saw this one and thought about going with it but decided that I really wanted my space to be light and airy.


I finally decided to do a little something different while still remaining conservative so I had my tub's pretty feet bronzed.  Once I chose the finish, Larry had the tub sent to a man who does all their glazing and this is how mine turned out. 


Having an antique claw foot tub in my home is really a joy!  I love the relaxation that it has added to my life and the uniqueness it brings to our home.  The best part of it is that I added this to our home for a fraction of the cost of a new clawfoot tub.  The plumbing was about 2/3 of the cost and I spent a total of about $1800 for this part of the project. 
 
Hope you found this inspiring!  Stay tune for the next feature of My Bathroom Remodel:  The Spa Shower. 

I'd love to hear from you!

Until next time,

 
Lisa


High Space Vignettes

Creating vignettes above cabinets and furniture is a great way to display items you've collected over the years.  To do this, keep a few things in mind.  First, you don't want so much stuff that it looks cluttered.  Choose your items wisely and limit them.  Secondly, when working with cabinets, create a vignette above each section.  This helps the eye pause at each section and take notice of what is up above.  Last, choose items that are large enough to see from down below. 


This is a picture of the kitchen cabinets in my own home.  I have displayed various pieces that I have gathered over the years.  My goals here were to find items that would bring more of my color palette into the room and that would contrast against the rich chocolate paint.  One of my favorite items is the log cabin that my father and I made for a 3rd grade project.  I'm so glad I kept it and lugged it around from house to house until I found the perfect spot for it in my home.  Isn't it precious? 
   
 
Here is a beautiful picture I found of an armoire with a collection of different textures of containers.  I love the mix of weathered wicker and terracotta.  Actually, I love everything about this room! 
 
 
Even modern spaces look great to display pieces up high.  Years ago, I had a friend whose home had alcoves, high ceilings and lighting centered in each alcove above his cabinets.  He displayed local artwork in each alcove.  I wish I could find a picture of it but this was the best I could do!
  
 
Here is a picture I found of another kitchen with cabinets decorated above.  I love the geese above the cabinet spaces.  I don't think they ever go out of style!
 
 
Above my dining room china cabinet, I added a pop of color to the room by painting a large basket I already had a pale blue.  I had an antique terracotta birdhouse that was given to me almost 20 years ago by a lady who was in her 90's at that time.  Her parents had brought it with them to America from Holland.  Then I added a small mossy basket at the end to give it more life.  Notice that I put my largest piece on the left and my smallest piece on the right.  We naturally look at picture starting high on the left and move diagonally to the bottom left. 
 
I hope you have been inspired to either create or rearrange items in your high spaces.  Remember, vignettes are pictures of what you want the eye to see.  Feel free to share with me obstacles you have.  I'd love to help!  And I'd love to see things that you have done in your own home. 
 
Sincerely,
 
Lisa